Saturday, September 28, 2013

Gingersnap Cookies


I was flipping through Tom Douglas' Seattle Kitchen cookbook yesterday...it's a wonderful book, full of really unique recipes.  Tom is the owner of quite a few restaurants in Seattle, including Dahlia Lounge, where I had one of the best meals of my life!

A recipe for gingersnaps caught my eye, and sounded so good!  After testing out the recipe, I altered it to use ground ginger instead of fresh, and took out a step where you roll the cookies in sugar.  If you'd like to see the original recipe, you can find it hereYou won't believe how soft and delicious these cookies are - if you like a firmer gingersnap, you can just add two minutes to the baking time.

<><><><><><><>


Wednesday, September 25, 2013

Sour Cream Pound Cake with Vanilla Cream and Blueberries


As much as I love pound cake, it can be...well, a little boring.  I think you will be pleasantly surprised how scrumptious my version tastes!  I made a sour cream pound cake, and the addition of the sour cream makes it really moist and rich.  I plated it with a vanilla cream and blueberries, and the sweetness of the vanilla cream and the tartness of the blueberries really makes this dessert sing!

I found the recipe for the pound cake in the Better Homes and Gardens' New Baking Book.  It's one of my favorite baking books, and it's so loved that it's dog-eared and covered with post-its and scribbled notes. 


Sunday, September 22, 2013

Sweet Shortcuts - Pumpkin Cheesecake

"Fall has always been my favorite season.  The time when everything bursts with its last beauty, as if nature had been saving up all year for the grand finale."  - Lauren DeStefano

All my friends are mourning the loss of summer, but honestly, I couldn't be happier!  I love autumn, and I can feel it coming...last night, there was a lovely chill in the air, and a big orange moon hung low on the horizon.  Sighhhh.

The beginning of fall always makes me want to bake things with pumpkin, cinnamon, nutmeg, and apples.  As I fall asleep, I'm thinking of soft cinnamon rolls, delicious apple crisps, and every other yummy autumn treat.

I woke up this morning with pumpkin on my mind, and not a lot of free time to make anything.  I had a No-Bake Cheesecake mix in my pantry, and I decided I would make it a pumpkin cheesecake and a Sweet Shortcut.  You will really love how easy it is to make this rich, creamy dessert.


Tuesday, September 17, 2013

Lemon Sugar Cookies


These lemon sugar cookies are so divine...soft and chewy with a little zing from the lemon.  This is my mother's recipe from the 70s, and it calls for bottled lemon juice - gasp!  You can feel free to use fresh lemon juice if you'd like, but I actually like the flavor the bottled juice gives these cookies.


Saturday, September 14, 2013

Boston Cream Pie Cupcakes


I love these Boston Cream Pie Cupcakes, and I've put some shortcuts in the recipe that I think you'll really like!

You start with vanilla cupcakes - it's up to you if they're from scratch, from a mix, or store-bought.  Then you just make a vanilla cream and a chocolate ganache before assembling.  Think those are complicated?  Not the way I make them!


Tuesday, September 10, 2013

Ice Cream Cone Cupcakes

I've been reading more and more about ice cream cone cupcakes, where you pour the batter in the cone and bake it.  I was a little dubious about how they would turn out, but I'm happy to say that I finally made them, and they're amazing!


I just know you will love these treats, because they're adorable and super easy to make.  You can use a store-bought mix or your favorite homemade recipe, and you can play around with different frosting flavors.  I used vanilla cake batter in mine (the recipe can be found here).

To stabilize the cones when you bake them, you can place them in a muffin or cupcake tin, like so:


I'm not sure why I did the every other hole layout, but you don't have to be like me - you can just put a cone in every opening.

Pour the batter into the cone, leaving room at the top for expansion.  You might have to play around with this a little...I ended up putting batter about halfway up the cone.

Bake for the same amount of time you would for cupcakes, but I recommend that you keep an eye on them for the last five minutes in case they start to over-brown.

Let them cool, and frost!  I used a pink lemonade recipe (found here), and piped it on with a jumbo closed star tip, but I think you could use any tip, or apply it by hand, and it would look lovely.

Here's one cut in half, so you can see what the inside looks like:


I added rainbow sprinkles to mine, because sprinkles make my heart sing (ha!) though you can use any sprinkles you like.  If you're a fellow sprinkle lover, check out my marshmallow treats with sprinkles here.  They were gone in a flash, so make sure to stash some away for yourself!

NOTE: the cone gets soggy fairly quickly, so I would recommend making them the day you plan to serve them.

- Sugar Baby

Monday, September 9, 2013

Marshmallow Treats - with Sprinkles!

Ahhh, marshmallow treats...love that crispy, gooey, deliciousness.  What could make them better?  Sprinkles, of course!


I simply made a classic marshmallow treats recipe, and stirred in sprinkles with the cereal:

Ingredients

3 tablespoons butter
1 package marshmallows (10 oz. package =  around 40 marshmallows)
6 cups puffed rice cereal
1/2 cup rainbow sprinkles

Directions
  • Melt the butter over low heat in a large saucepan.
  • Add marshmallows and stir until melted.
  • Remove from heat and add puffed rice cereal and sprinkles.
  • Stir, stir, stir until they're well mixed.  Use those arm muscles to get everything incorporated!
  • Place mixture in a 13 x 9 x 2 pan that has been coated with cooking spray.
  • Use a piece of waxed people to help smoosh the mixture into the pan.

Important:  Let cool for several hours.  It may look cool, but you have to let the marshmallowy goodness really set to get the best results.

FYI - My recipe says to store these for no more than two days at room temperature, but don't worry...these babies will be LONG gone by then!

- Sugar Baby

Monday, September 2, 2013

Sweet Shortcuts - Apple Pie Napoleon

Making a pie from scratch can be intimidating, but have no fear - Sugar Baby to the rescue!

I have created an apple pie napoleon from frozen pie crust and canned apple pie filling, and it is SCRUMPTIOUS!


Directions:

Preheat the oven to 350 degrees and flour a cutting board.

Defrost the pie crust per the instructions on the box/bag and unroll it onto the cutting board. [If it cracks or breaks, just smoosh it back together.]

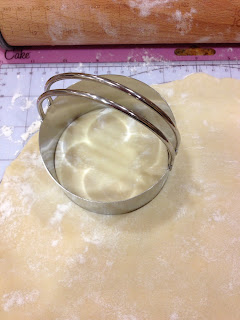
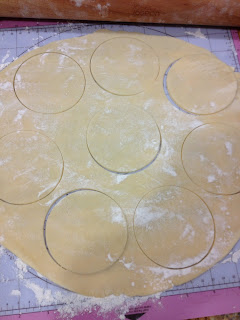
Cut out circles - I used a three inch biscuit cutter, but you can use whatever you want to cut your circles...even drinking glasses!


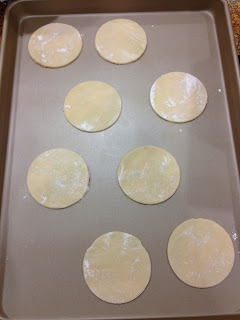
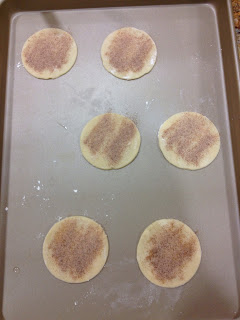
Place the circles on a cookie sheet and sprinkle them with cinnamon sugar.


Bake for 8 - 10 minutes until crispy.

Microwave your pie filling until it's nice and warm...mmm.

Plating:

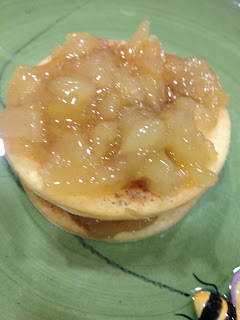
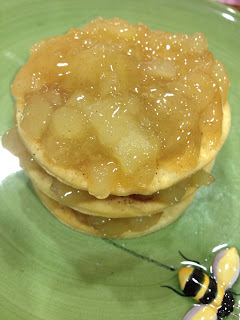
Place one of the dough circles on a plate, and cover it with the warmed filling.


Do two more layers in this manner.


Garnish with whipped cream on top, and serve!


******************

Oh, goodness...how to describe the flavors and textures of this delicious dessert?  Crispy, sweet dough contrasting with the oozy warm pie filling.

I cut it down the middle with my fork, and broke everything into bite size pieces.  I'm embarrassed to say that when I finished eating, I kept scraping my fork across the plate to try to get every last crumb and drop of filling.  I may have even licked the plate.  (Who, me?)

This napoleon is a really beautiful and unique presentation, and is a lot easier than making an apple pie from scratch.  These would be great for a dinner party dessert, and are a cinch to put together after the meal.

Hope you enjoy this!
- Sugar Baby